

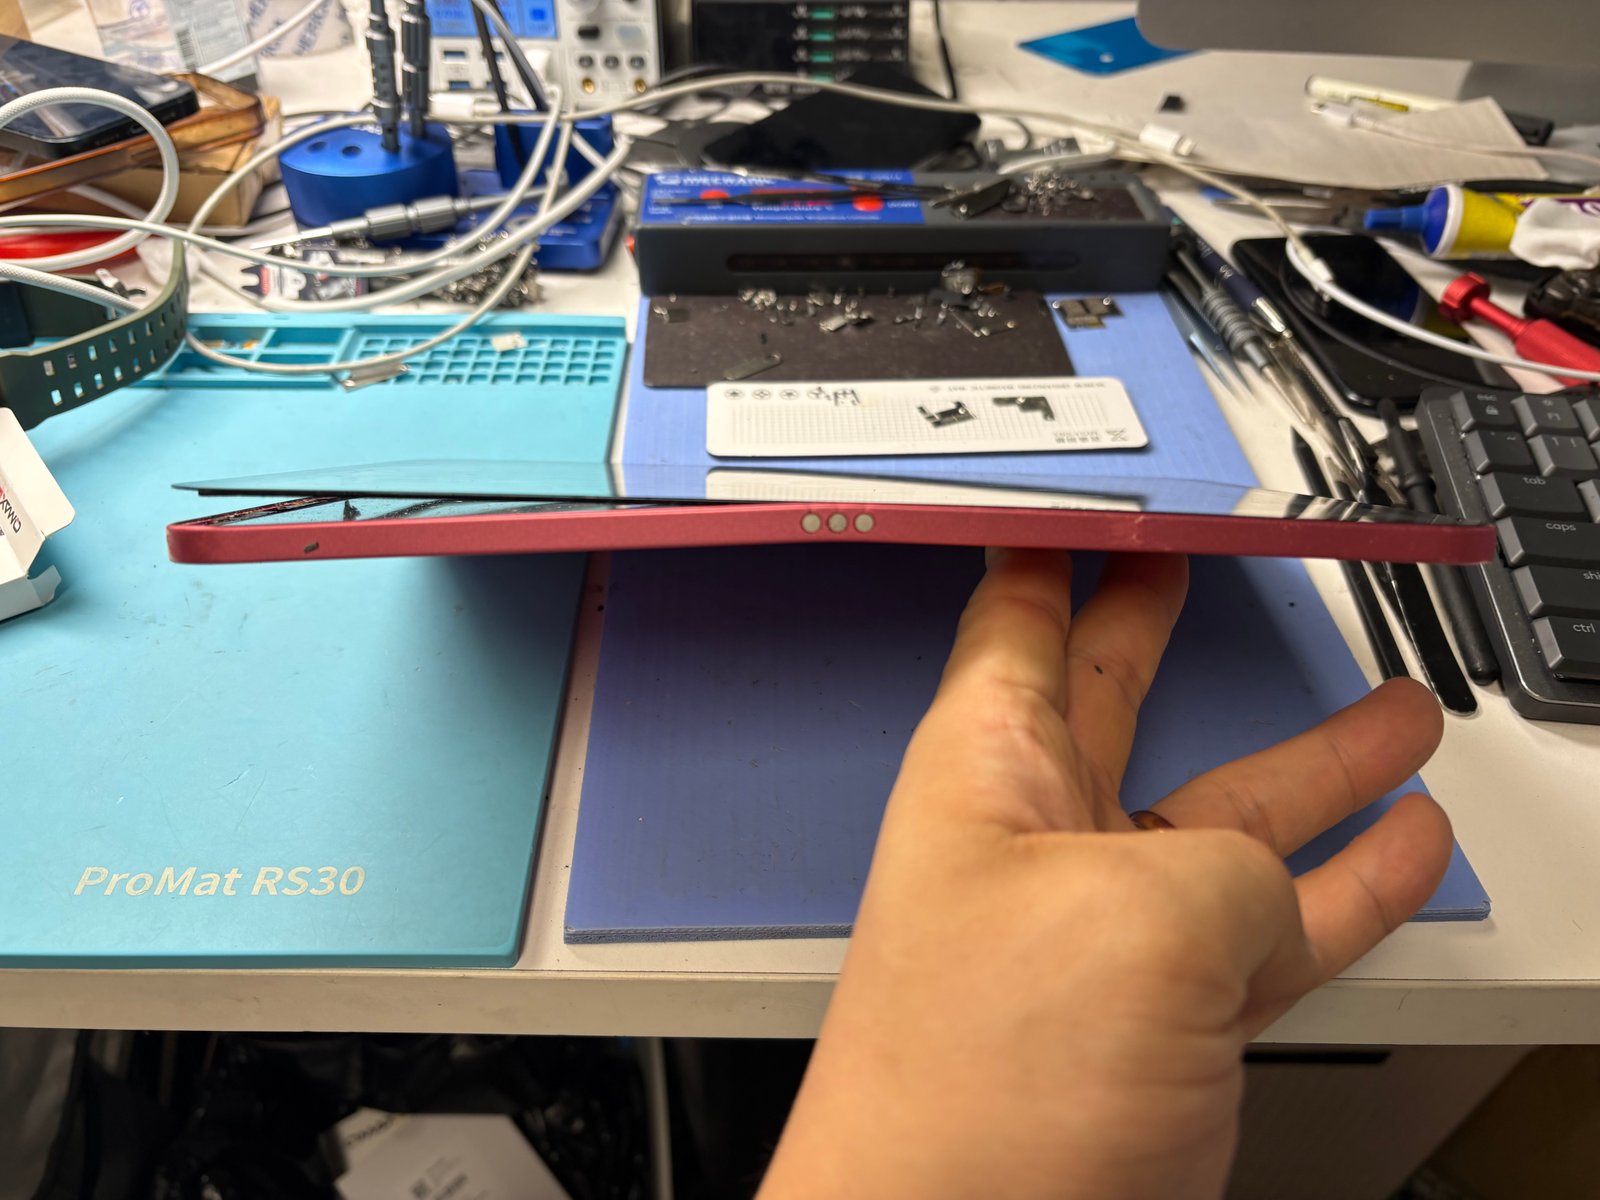
Bent Body, Lifting ScreeniPad 10th Gen Frame Straightening & Screen Rebonding — Downtown LA
Nothing was dropped and nothing was shattered. The body itself had bent, the screen started lifting away from the frame, and for months that open gap quietly pulled in dust. Dust under the glass cannot be wiped off — it is on the inside. Here is how we straightened the frame, cleaned it all out, and bonded the screen back down, step by step.

Body bent, screen separated, dust pulled inside
Frame corrected, interior cleaned, screen re-seated
Display and touch fine, dust under the glass gone
The job, on one card
Everything that matters about this repair, before the story.
| Model | iPad 10th generation (2022) · Pink |
|---|---|
| Problem | The body had bent, so the screen (digitizer) lifted off the frame and left an open gap along the edge. Dust kept getting pulled through that gap and settled under the glass, visible every time the screen lit up. |
| Repair | Screen removed → dust cleaned off the glass, LCD and frame → bent frame straightened → screen re-seated with fresh adhesive. The glass was not cracked, so the original screen was reused — and the LCD survived untouched. |
| Teardown | Intermediate3 / 5 |
| Tech’s note | On the iPad 10 the glass and the LCD are separate parts, so if you lift the glass carefully the LCD stays safe in the chassis. Two things decide this repair: straighten the bent frame first so you have a flat surface to bond to, and get every last bit of dust out before the new adhesive goes down. Re-glue the glass onto a bent frame and it will be lifting again within days. |
Why iPads bend, and how the dust gets in
No drop, no crack — and it still ends up on the bench. This pattern is more common than you would think.
A wide, thin sheet of aluminum
An iPad is a large, thin aluminum plate. Squeezed in a backpack, wedged into a couch cushion, or sat on for a second — force concentrates on one edge and the frame slowly takes a bend. No drop required.
Adhesive can’t fight a bend
The screen is glued to the frame around its perimeter. When the frame bows, the glass tries to stay flat, and the adhesive loses that fight — the screen peels up starting from the bent side. That is exactly the state this iPad arrived in.
An open gap is a dust intake
Once a gap opens, pocket lint and bag dust get pulled in continuously. Dust under the glass cannot be wiped away, and left long enough it reaches the LCD and the touch cables — turning a cosmetic problem into a functional one.

Straighten, clean out, bond back down
In the order it actually happened on the bench.

Checked in — the gap tells the story
From the side the damage is obvious: the screen has peeled off the bowed edge and left an open gap, and the dusty glass shows how long it has been breathing in lint and debris. Display and touch still worked — this was a frame problem, not a screen problem.

Everything out — dust on every layer
The glass comes off slowly with gentle heat so it survives in one piece, then the LCD lifts out after it. Laid side by side, the scale shows: months of dust settled on the LCD surface and the inside of the glass — the dust you could see from outside, and none of it wipeable while assembled.

Every speck comes out
The inside of the glass, the LCD surface and the frame rail all get cleaned of dust and old adhesive — the clump on the cloth is what came in through that gap. This is the slowest step on purpose: anything left behind ends up as a permanent speck under the glass after rebonding.

Taking the bend back out
The moment that decides the repair. The bent edge is sandwiched between two wooden blocks so bare metal never touches steel, and a C-clamp at the edge of the bench applies pressure a quarter-turn at a time — tightening, checking, never all at once. Force it and the aluminum tears or the battery underneath gets crushed. This flat surface is what keeps the screen from ever lifting again.

New adhesive on a now-flat rail
With the frame straight and spotless, fresh double-coated adhesive tape goes around the entire rail. Adhesive is only as good as the surface under it — laying it on the corrected, cleaned frame is what makes the new bond actually hold.

Reassembly, in reverse order
Assembly runs the teardown in reverse: the LCD goes back into the chassis and gets reconnected first, then the cleaned glass is lined up and seated onto the fresh adhesive. Alignment has to be right the first time — the tape grabs on contact.

Even pressure on every edge
Clamps ring the entire perimeter while the adhesive cures. Thumb pressure for a few seconds does not do this job — the bond needs even pressure on every edge so the corners seal completely and dust never finds a way back in.
Flat again, clean again
Cured, reassembled, and tested before it left the bench.
The gap is gone — so is the dust
From the side, the screen now sits flush against the frame with no step and no gap. We checked the display, touch, Touch ID and speakers, and every speck that was under the glass is gone. Nothing on the tablet was wiped — photos, apps and settings all stayed put.
Because the glass never cracked, the original screen was reused instead of replaced — that is a real difference in cost. The same symptom with a cracked glass becomes a screen replacement instead; we can tell you which one you need before anything is taken apart.

Bent iPads, lifting screens, trapped dust
What people with the same symptoms actually ask us.
My iPad is bent — does the whole body need replacing?
It depends on how far it went. A gentle bow like this one can be straightened back, which costs far less than a housing swap. Only a sharp crease that has damaged internal parts or torn the aluminum calls for a different conversation. We can tell from a free diagnosis before anything is opened.
There’s dust under my screen — can it be wiped off?
Not from the outside. Dust under the glass can only be removed by lifting the screen and cleaning the inside. The good news: if the glass isn’t cracked, it can be reused after cleaning, which keeps the cost down — exactly what happened in this repair.
Can you remove and re-attach a screen that isn’t broken?
Yes. With heat and the right tools the adhesive releases and the glass comes off in one piece, then goes back on with fresh adhesive after cleaning and frame correction. A glass that is already cracked tends to break further during removal, so those cases are quoted as a screen replacement instead.
Will I lose my data?
No. Frame straightening and screen rebonding never touch storage — photos, apps and settings stay exactly as they were. We still recommend a backup before any repair, simply because it costs nothing to be safe.
Won’t the screen just lift again after rebonding?
Only if the cause is left in place. The screen lifted because the frame was bent — not because the factory glue was bad. We straighten the frame first, then cure the new bond under clamps around the full perimeter. Fix the cause and there is no reason for it to lift again.
Which iPad models do you repair?
Every generation of the standard iPad including the 10th gen, plus iPad Air, Pro and mini — and Android tablets like the Galaxy Tab as well. Walk into our Downtown Los Angeles shop; diagnosis is free.
iPad screen starting to lift?
Before it cracks is the cheapest time to fix it. Diagnosis is free, and you get the scope and the price before anything comes apart. Walk-ins welcome in Downtown Los Angeles.